5 Kasım 2012 Pazartesi

Vegan Glorified Rice

To contact us Click HERE
I grew up eating sweet, fluffy Glorified Rice at Grandma's house every Thanksgiving and Christmas. Grandma and Betty Crocker taught me to mix rice with crushed pineapple, whipped cream, and maraschino cherries. But now that so many people in our family are vegan (yay!), I wanted to come up with a non-dairy, sans technicolored cherries version. I did it! The flavor is so spot-on, even Grandma would approve.

serves 6 to 8

1 cup dry short grain white rice
One 20 oz. can crushed pineapple, well drained
½ cup + 4 tablespoons sugar
One 12.3 oz. pkg. firm silken tofu
2 tablespoons fresh lemon juice
1 pint fresh strawberries, sliced


Cook the white rice according to package directions. While the rice is still hot, place the rice in a large mixing bowl and stir in the crushed pineapple and ½ cup sugar. Let the mixture rest at room temperature for one hour to cool. Cover and refrigerate until cold.

Place the silken tofu, 4 tablespoons sugar, and lemon juice in a Vita-Mix or other blender. Blend until completely smooth. Fold the blended tofu into the rice mixture, breaking apart any clumps of rice with a wooden spoon.

Top with fresh sliced strawberries and serve.

Petite Pasta Salad

To contact us Click HERE
A fun and easy way to show off those adorable teeny-tiny pasta shapes like stars or alphabets that you usually see in soup. Adjust the vegetables according to your taste.

serves 4 to 6

One 7 oz. package tiny pasta stars or alphabet shapes
1 cup frozen corn
8 oz. sugar snap or snow peas, cut into bite-size pieces
One cucumber, peeled or not as desire, cut into bite-size pieces
One tomato, seeded and diced
½ a red or orange bell pepper, diced
One 2.25 oz. can sliced black olives, rinsed and drained
½ cup fresh cilantro, chopped
1 tablespoon fresh basil, chopped
2 tablespoons olive oil
1 to 2 tablespoons white wine vinegar, to taste (the smaller amount of vinegar may appeal more to children with sensitive palates)
1 teaspoon white balsamic vinegar
Salt and white pepper, to taste


Bring a medium saucepan of water to a boil. Add the pasta and cook until just barely tender, about 2 to 3 minutes. During the last minute, add the frozen corn and chopped sugar snap or snow peas.

Drain the pasta, corn, and peas and rinse well with cold running water. Drain.

In a large mixing bowl, toss the pasta, corn, and peas with the rest of the vegetables and fresh herbs.

In a small bowl whisk together the olive oil, vinegars, salt, and white pepper. Pour over the pasta salad and toss together until well combined. Taste and adjust seasonings according to taste.

Christmas Limas with Chestnuts and Brussels Sprouts

To contact us Click HERE
A lovely celebration dish for the holidays, filled with sweet chestnuts and hearty Christmas Lima Beans. Christmas Limas are also called Chestnut Limas, because they have the nutty flavor and potato-ey texture of a chestnut. They are lovely, large beans with white and burgundy swirls that you can still see after the beans are cooked.

These Brussels sprouts are finely shredded and almost disappear into the dish -- a nice way to be sneaky with them if you or your family don't normally like them.

serves 6

1 cup dried Christmas Lima Beans
2 tablespoons olive oil
8 fresh Brussels sprouts, cleaned, ends removed, and leaves finely shredded
One 7 oz. package vacuum packed chestnuts or 20 fresh chestnuts, roasted and peeled
3 tablespoons brown sugar
1 tablespoon apple cider vinegar
Salt and freshly ground black pepper, to taste

Soak the lima beans overnight in water to cover. Drain, rinse, and place in a medium saucepan with fresh water to cover. Bring to a boil and reduce heat; simmer until the beans are tender, about 40 minutes to 1 hour. Drain, reserving some of the bean broth.

Heat the olive oil in a large skillet over medium heat. Add the shredded Brussels sprouts leaves and cook, stirring, until the greens are tender and beginning to turn golden, about 2 minutes. Add the beans, chestnuts, brown sugar, apple cider vinegar, and a ½ cup of bean broth. Stir together and simmer until the liquid has cooked away and everything is heated through. Season with salt and pepper to taste.

Vegan Fudge

To contact us Click HERE

Oooh, this fudge is creamy, rich, smooth and sweet. Basically, it's everything you ever dreamed chocolate fudge could be. And no one will believe that there's no dairy, butter, or evaporated milk in here.

It can be a bit soft, though, especially if you add the optional marshmallow fluff, so keep it well refrigerated.

makes one 9-inch x 9-inch pan

4 cups powdered sugar
½ cup cocoa powder
½ cup nondairy milk
2 tablespoons nonhydrogenated margarine
1 ½ teaspoons vanilla
½ cup vegan chocolate chips
1 cup cut up vegan marshmallows or ½ cup Ricemellow Creme (optional but sooo good)
½ cup chopped nuts

Spray a 9-inch x 9-inch baking pan well with nonstick spray and set aside. (For holiday gift giving I used seven well-sprayed foil baking cups.)

Sift the powdered sugar and cocoa powder together into a large mixing bowl, add the chocolate chips, and set aside.

In a small saucepan, heat the nondairy milk and margarine to a boil over medium-high heat, stirring constantly to avoid burning. When the milk is at a steady, strong boil, pour it over the powdered sugar mixture and stir well with a wooden spoon until everything is well combined and the heat has melted the chocolate chips.

Stir in the vanilla, then fold in the marshmallows or Ricemellow Creme and the nuts.

Spread the fudge out into the prepared pan(s) and refrigerate for a day or more to solidify.

Variations: One inspired cook used soy nog for the nondairy milk with great results.

Candice's Roll-Out Vegan Oatmeal Cookies

To contact us Click HERE
This recipe is from Candice, one of the winners of the Vegan Lunch Box Contest. These healthy cookies contain powdered soy milk (available at health food stores), rolled oats, wholewheat flour, wheat germ, almonds, and flax seeds. "They aren't very sweet," Candice says. "I mostly make them to have a fun activity to do with my 3 1/2 year old son."

Thanks for sharing it with us, too, Candice!

makes 5-6 dozen cookies (or 4 if you use big shapes)

1 cup vegetable oil
1 cup brown sugar
1 2/3 cup rolled oats
1/3 cup mixture of the following: flax seeds, sesame seeds, sunflower seeds, and almond slivers
(I actually pre-mix a container of this along with rolled oats that I use in all kind of recipes involving oatmeal. When I make these cookies, I do 1 cup of regular rolled oats and 1 cup of my special "medley")
1 cup powdered soy milk
½ cup water
2 ¼ - 2 ½ wheat flour (finely ground)
3 tsp baking powder
1 tsp salt


Preheat oven to 325º.

Cream together vegetable oil and brown sugar. Add the oats, seed-nut mixture, powdered soy milk, and water, and beat well.

Sift together the flour, baking powder, and salt. Fold into creamed mixture and mix well. You are supposed to chill the dough but I don't have any trouble working with it immediately.

Sprinkle flour on a surface and roll out the dough (since this is a vegan recipe, and therefore not dangerous to eat raw, the whole reason I adapted this recipe was so that my almost 4-year-old son could help me roll it out and use cookie cutters. He is always dying to help me do things in the kitchen! Using the sifter is fun, too!)

Cut out shapes from rolled dough (about 1/4 inch thick) and place on baking sheets. Put the sheets in the oven as soon as they are filled. Bake about 10-15 minutes.

4 Kasım 2012 Pazar

Vermont Maple No-Bake Cookies {Thanks, Tonewood Maple!}

To contact us Click HERE

I am a huge fan of maple syrup!  Pure Vermont maple syrup, to be exact.  As many of you already know, I grew up in Vermont.  Since moving to North Carolina (eighteen years ago after finishing college), I still have Vermont maple syrup shipped to me.  For me, there's no substitute.
So when I had the opportunity to try Tonewood Maple's syrup, ...

I jumped at the chance!  Tonewood Maple is a producer of premium pure Vermont maple products.  And can I just tell you that I adore them already?  Like totally major crush.
And here's why I think they're totally crush-worthy.
1.  They're from Vermont and they make maple stuff.  To me, that alone makes them crush-worthy. 
2.  They sent me a package with their awesome syrup.  I looooooove to get packages!!  It's like getting a Christmas present in the mail.  Even when you know what's in the box!  (My husband doesn't understand how I can get so excited about this.)
3.   The package arrived on my birthday.  Aren't they so sweet to make sure it arrived on my special day??  (I know, I know ... they had no idea it was my birthday ... but, I can pretend right?)
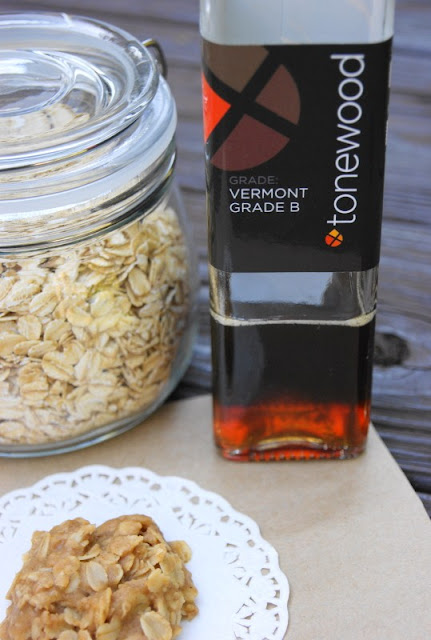
4.  They're either clairvoyant, or read my blog.  'Cause they sent me my favorite grade of maple syrup ... grade B, baby!  I did a post about grade B maple syrup a while back.  Grade B is where it's at.  See that beautiful bottle of grade B?  

5.  They included a hand-written note in the package.  I truly think hand-written notes are a lost art now a'-days.  But they so bring a smile.  I love getting hand-written notes in the mail.  Thank you for my note, Dori!

I have lots of maple recipes, but I kinda wanted to make something new with my Tonewood maple.  So I popped on over to Dori's blog to take a look at the maple recipes she's posted.
I was intrigued with maple syrup no-bake cookies, so I gave them a try.  The ones on Dori's blog use maple syrup as the sweetener, and include cocoa and peanut butter just like 'traditional' no-bake cookies.  They were good.  But I wanted to taste maple, not cocoa and peanut butter.
So what do you think I did?
Well, of course! ... I created my own Vermont Maple No-Bake Cookies.  That taste maple.  I will admit that this took me many more tries than I thought it would, but hubby and I are really happy with the result.  Hubby is so happy with the result, he ate almost the entire last batch ... minus the one I ate to do a taste test.
The first challenge in creating these Vermont Maple No-Bake Cookies was to find a replacement for the peanut butter that would let the maple flavor come through.  The solution?  Almond butter.  It lends the same nut butter-type base to the cookies without the peanut butter taste.
The second ... and major ... challenge was to get the consistency of the cookie mixture right.  This was actually a bit tough to work out.  Since almond butter isn't as creamy as peanut butter, it takes some milk to give a creamy cookie texture.  But too much milk tones down the maple flavor too much.  Not enough milk, and the cookies don't hold together.  After several tries with differing amounts of butter, maple syrup, and milk, I finally found a combination that gave the texture and flavor I was looking for ... soft, creamy texture with a definite maple flavor.

I had so much fun playing with my Tonewood Maple sample to create these scrumptious cookies.  I've got a couple of more maple recipes coming up, so maple fans stay tuned!

Thank you so much, Tonewood Maple!

I invite you to follow The Kitchen is My Playground with Pinterest, Facebook, Google Friend Connect, Linky Followers, bloglovin', or Feedburner. Buttons are in the right sidebar. I'd love to have you back soon!


Vermont Maple No-Bake Cookies
Source:  A Tracey Original

1/4 c. butter
1/2 c. pure maple syrup (preferably grade B)
2 T. milk
1/2 tsp. vanilla extract
Pinch of salt
1/4 c. almond butter
3/4 c. old-fashioned oats

Combine butter, maple syrup, and milk in a small saucepan.  Bring to a boil over medium-high heat.  Boil for a full 3 minutes, stirring constantly.  Remove from heat and let cool for 2 minutes.  Stir in vanilla extract, salt, almond butter and oats.  Drop by spoonfuls onto wax paper and allow cookies to cool.

Makes 12 cookies.

Notes:
- Boiling the maple syrup mixture for a full 3 minutes over medium-high heat is very important.  The mixture will be kind of 'frothy' for a while during boiling ... don't worry.  Just keep stirring!
- If your cookie mixture is too thick after stirring in the oats, add a teeny tiny bit of milk ... just 1 teaspoon at a time.  The mixture goes from 'too dry' to 'too wet' pretty quickly when adding milk, so go slow.  Also, while the milk adds a wonderful creaminess to the texture of the cookies, it seems to tone down the maple flavor ... so add sparingly.

Enjoy!


Disclaimer:  Tonewood Maple provided a product sample of their Pure Vermont Grade B Maple Syrup.  Monetary compensation was not provided for the writing of this post.  All expressed opinions are solely those of Tracey at The Kitchen is My Playground.


This post is linked with Cast Party Wednesday, Thursday's Treasures, Sweet Treats & Swanky Stuff, Share Your Creations, Full Plate Thursday, Pin It Thursday, Inspiration Friday, Foodie Friday, Weekend Potluck, Foodie Friday with Diane Balch, Strut Your Stuff Saturday, Think Pink Sunday, Sundae Scoop, Nifty Thrifty Sunday, Sunday Showcase Party, On the Menu Monday, Mangia Mondays, Crazy Sweet Tuesday, Tuesday Talent Show, Totally Tasty Tuesday, Tip Me Tuesday.

Gingerbread Vampires

To contact us Click HERE
 Who says gingerbread men are just for Christmas?  Not these guys.  These gingerbread men cookies have put on their vampire costumes for Halloween!
I wish I could take credit for this clever idea ... but alas, I cannot. 

These Halloween dudes were inspired by Southern Supreme Gourmet Specialties, a mail-order gourmet food company located in middle-of-nowhere, North Carolina (a teeny town called Bear Creek, to be exact.)  My Mom and I visited their showroom a few weeks back and spotted their cute and clever little Halloween gingerbread vampires (which aren't available on their website ... showroom only item).  I decided I needed to try that myself!
So I came home and whipped up a batch.

To create these ghoulish vampires, make your favorite gingerbread cookies just like you always would ... here's my favorite gingerbread cookie recipe, if you need one.  Then use a dab of black frosting or royal icing to make eyes, buttons, and a straight across mouth ... add a smidge of white for fangs ... and pop three red mini candies or sprinkles on top of the black frosting buttons.  I used red x's from a Valentines' Day hugs & kisses sprinkles mix, but you could also use cinnamon redhots, mini M&Ms, or any other small red candy.  Voila!  Halloween vampire cookies.

Now, in the spirit of full and honest disclosure, these little guys were not quite as easy to produce as I had expected.  But part of that was because I was being lazy.  See, I used that frosting-in-an-aerosol can stuff you can buy at the grocery store.  You know, the stuff that sprays out kinda like Easy-Cheez?  Well ... let me just tell ya ... that stuff is not easy to control when trying to make small squirts!!
So, if like me, you're afraid to try to make your own black frosting (I didn't think I could get it dark enough! ... hence the reason for the purchase of Easy-Cheez-type frosting) ... I suggest possibly dispensing the aerosol can frosting into your own piping bag first so you'll have better control.
If you choose to go straight from the can like I did, here are two suggestions:
1.  Practice on waxed paper or a plate first.
2.  Use toothpicks.  Toothpicks became my best friends!  Get a bit of frosting where you want it to be, and use a toothpick to coax it into the 'formation' you want.  And to clean up any 'oops.'
Once you get your little guys ready, serve up a little platter as a special vampire Halloween treat.

Of course, if you get too frustrated making these little guys ... which you won't ... you could always do what my hubby suggested ... Bite their heads off and turn them into The Legend of Sleepy Hollow  headless horseman gingerbread cookies!
Not nice, Mark.  Not nice.  But still appropriate for Halloween, I suppose.
I invite you to follow The Kitchen is My Playground with Pinterest, Facebook, Google Friend Connect, Linky Followers, bloglovin', or Feedburner. Buttons are in the right sidebar. I'd love to have you back soon!  
Gingerbread Vampire CookiesSource:  Inspired by Southern Supreme Gourmet Specialties
One batch baked gingerbread men cookiesBlack frostingWhite frostingSmall red x sprinkles, mini M&Ms, or cinnamon redhots
Pipe small dots of black frosting onto each gingerbread man for eyes and buttons.  Pipe a small staight line of black frosting as the mouth.  Carefully place a red sprinkle or mini candy into the button frosting dots; gently push down slightly with a toothpick.  Pipe a small amount of white frosting below the black mouth line to create fangs.  Use a toothpick to taper the fangs to be thinner at the end farthest away from the mouth line.  Set aside to let the frosting harden.  Store in an airtight container, carefully stacked.  (Check the 'hardness' of the frosting prior to stacking to avoid smudging and smooshing.)Enjoy!


This post is linked with Strut Your Stuff Saturday, Sweets for a Saturday, Think Pink Sunday, Sundae Scoop, Nifty Thrifty Sunday, Your Great Idea Party, Sunday Showcase Party, On the Menu Monday, Mangia Mondays, Crazy Sweet Tuesday, Tuesday Talent Show, Totally Tasty Tuesday, Whatcha Whipped Up Wednesday, Cast Party Wednesday, Sweet Treats & Swanky Stuff, Thursday Treasures, Kitchen Fun & Crafty Friday, Share Your Creations Thursday, Pin It Thursday, Inspiration Friday, Foodie Friday, Weekend Wrap Up Party, Weekend Potluck, Weekend Bloggy Reading, I'm Lovin It, Tip Me Tuesday.