4 Kasım 2012 Pazar

Vermont Maple No-Bake Cookies {Thanks, Tonewood Maple!}

To contact us Click HERE

I am a huge fan of maple syrup!  Pure Vermont maple syrup, to be exact.  As many of you already know, I grew up in Vermont.  Since moving to North Carolina (eighteen years ago after finishing college), I still have Vermont maple syrup shipped to me.  For me, there's no substitute.
So when I had the opportunity to try Tonewood Maple's syrup, ...

I jumped at the chance!  Tonewood Maple is a producer of premium pure Vermont maple products.  And can I just tell you that I adore them already?  Like totally major crush.
And here's why I think they're totally crush-worthy.
1.  They're from Vermont and they make maple stuff.  To me, that alone makes them crush-worthy. 
2.  They sent me a package with their awesome syrup.  I looooooove to get packages!!  It's like getting a Christmas present in the mail.  Even when you know what's in the box!  (My husband doesn't understand how I can get so excited about this.)
3.   The package arrived on my birthday.  Aren't they so sweet to make sure it arrived on my special day??  (I know, I know ... they had no idea it was my birthday ... but, I can pretend right?)
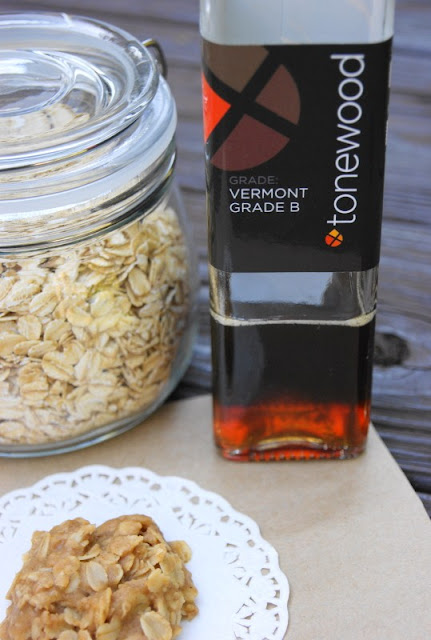
4.  They're either clairvoyant, or read my blog.  'Cause they sent me my favorite grade of maple syrup ... grade B, baby!  I did a post about grade B maple syrup a while back.  Grade B is where it's at.  See that beautiful bottle of grade B?  

5.  They included a hand-written note in the package.  I truly think hand-written notes are a lost art now a'-days.  But they so bring a smile.  I love getting hand-written notes in the mail.  Thank you for my note, Dori!

I have lots of maple recipes, but I kinda wanted to make something new with my Tonewood maple.  So I popped on over to Dori's blog to take a look at the maple recipes she's posted.
I was intrigued with maple syrup no-bake cookies, so I gave them a try.  The ones on Dori's blog use maple syrup as the sweetener, and include cocoa and peanut butter just like 'traditional' no-bake cookies.  They were good.  But I wanted to taste maple, not cocoa and peanut butter.
So what do you think I did?
Well, of course! ... I created my own Vermont Maple No-Bake Cookies.  That taste maple.  I will admit that this took me many more tries than I thought it would, but hubby and I are really happy with the result.  Hubby is so happy with the result, he ate almost the entire last batch ... minus the one I ate to do a taste test.
The first challenge in creating these Vermont Maple No-Bake Cookies was to find a replacement for the peanut butter that would let the maple flavor come through.  The solution?  Almond butter.  It lends the same nut butter-type base to the cookies without the peanut butter taste.
The second ... and major ... challenge was to get the consistency of the cookie mixture right.  This was actually a bit tough to work out.  Since almond butter isn't as creamy as peanut butter, it takes some milk to give a creamy cookie texture.  But too much milk tones down the maple flavor too much.  Not enough milk, and the cookies don't hold together.  After several tries with differing amounts of butter, maple syrup, and milk, I finally found a combination that gave the texture and flavor I was looking for ... soft, creamy texture with a definite maple flavor.

I had so much fun playing with my Tonewood Maple sample to create these scrumptious cookies.  I've got a couple of more maple recipes coming up, so maple fans stay tuned!

Thank you so much, Tonewood Maple!

I invite you to follow The Kitchen is My Playground with Pinterest, Facebook, Google Friend Connect, Linky Followers, bloglovin', or Feedburner. Buttons are in the right sidebar. I'd love to have you back soon!


Vermont Maple No-Bake Cookies
Source:  A Tracey Original

1/4 c. butter
1/2 c. pure maple syrup (preferably grade B)
2 T. milk
1/2 tsp. vanilla extract
Pinch of salt
1/4 c. almond butter
3/4 c. old-fashioned oats

Combine butter, maple syrup, and milk in a small saucepan.  Bring to a boil over medium-high heat.  Boil for a full 3 minutes, stirring constantly.  Remove from heat and let cool for 2 minutes.  Stir in vanilla extract, salt, almond butter and oats.  Drop by spoonfuls onto wax paper and allow cookies to cool.

Makes 12 cookies.

Notes:
- Boiling the maple syrup mixture for a full 3 minutes over medium-high heat is very important.  The mixture will be kind of 'frothy' for a while during boiling ... don't worry.  Just keep stirring!
- If your cookie mixture is too thick after stirring in the oats, add a teeny tiny bit of milk ... just 1 teaspoon at a time.  The mixture goes from 'too dry' to 'too wet' pretty quickly when adding milk, so go slow.  Also, while the milk adds a wonderful creaminess to the texture of the cookies, it seems to tone down the maple flavor ... so add sparingly.

Enjoy!


Disclaimer:  Tonewood Maple provided a product sample of their Pure Vermont Grade B Maple Syrup.  Monetary compensation was not provided for the writing of this post.  All expressed opinions are solely those of Tracey at The Kitchen is My Playground.


This post is linked with Cast Party Wednesday, Thursday's Treasures, Sweet Treats & Swanky Stuff, Share Your Creations, Full Plate Thursday, Pin It Thursday, Inspiration Friday, Foodie Friday, Weekend Potluck, Foodie Friday with Diane Balch, Strut Your Stuff Saturday, Think Pink Sunday, Sundae Scoop, Nifty Thrifty Sunday, Sunday Showcase Party, On the Menu Monday, Mangia Mondays, Crazy Sweet Tuesday, Tuesday Talent Show, Totally Tasty Tuesday, Tip Me Tuesday.

Gingerbread Vampires

To contact us Click HERE
 Who says gingerbread men are just for Christmas?  Not these guys.  These gingerbread men cookies have put on their vampire costumes for Halloween!
I wish I could take credit for this clever idea ... but alas, I cannot. 

These Halloween dudes were inspired by Southern Supreme Gourmet Specialties, a mail-order gourmet food company located in middle-of-nowhere, North Carolina (a teeny town called Bear Creek, to be exact.)  My Mom and I visited their showroom a few weeks back and spotted their cute and clever little Halloween gingerbread vampires (which aren't available on their website ... showroom only item).  I decided I needed to try that myself!
So I came home and whipped up a batch.

To create these ghoulish vampires, make your favorite gingerbread cookies just like you always would ... here's my favorite gingerbread cookie recipe, if you need one.  Then use a dab of black frosting or royal icing to make eyes, buttons, and a straight across mouth ... add a smidge of white for fangs ... and pop three red mini candies or sprinkles on top of the black frosting buttons.  I used red x's from a Valentines' Day hugs & kisses sprinkles mix, but you could also use cinnamon redhots, mini M&Ms, or any other small red candy.  Voila!  Halloween vampire cookies.

Now, in the spirit of full and honest disclosure, these little guys were not quite as easy to produce as I had expected.  But part of that was because I was being lazy.  See, I used that frosting-in-an-aerosol can stuff you can buy at the grocery store.  You know, the stuff that sprays out kinda like Easy-Cheez?  Well ... let me just tell ya ... that stuff is not easy to control when trying to make small squirts!!
So, if like me, you're afraid to try to make your own black frosting (I didn't think I could get it dark enough! ... hence the reason for the purchase of Easy-Cheez-type frosting) ... I suggest possibly dispensing the aerosol can frosting into your own piping bag first so you'll have better control.
If you choose to go straight from the can like I did, here are two suggestions:
1.  Practice on waxed paper or a plate first.
2.  Use toothpicks.  Toothpicks became my best friends!  Get a bit of frosting where you want it to be, and use a toothpick to coax it into the 'formation' you want.  And to clean up any 'oops.'
Once you get your little guys ready, serve up a little platter as a special vampire Halloween treat.

Of course, if you get too frustrated making these little guys ... which you won't ... you could always do what my hubby suggested ... Bite their heads off and turn them into The Legend of Sleepy Hollow  headless horseman gingerbread cookies!
Not nice, Mark.  Not nice.  But still appropriate for Halloween, I suppose.
I invite you to follow The Kitchen is My Playground with Pinterest, Facebook, Google Friend Connect, Linky Followers, bloglovin', or Feedburner. Buttons are in the right sidebar. I'd love to have you back soon!  
Gingerbread Vampire CookiesSource:  Inspired by Southern Supreme Gourmet Specialties
One batch baked gingerbread men cookiesBlack frostingWhite frostingSmall red x sprinkles, mini M&Ms, or cinnamon redhots
Pipe small dots of black frosting onto each gingerbread man for eyes and buttons.  Pipe a small staight line of black frosting as the mouth.  Carefully place a red sprinkle or mini candy into the button frosting dots; gently push down slightly with a toothpick.  Pipe a small amount of white frosting below the black mouth line to create fangs.  Use a toothpick to taper the fangs to be thinner at the end farthest away from the mouth line.  Set aside to let the frosting harden.  Store in an airtight container, carefully stacked.  (Check the 'hardness' of the frosting prior to stacking to avoid smudging and smooshing.)Enjoy!


This post is linked with Strut Your Stuff Saturday, Sweets for a Saturday, Think Pink Sunday, Sundae Scoop, Nifty Thrifty Sunday, Your Great Idea Party, Sunday Showcase Party, On the Menu Monday, Mangia Mondays, Crazy Sweet Tuesday, Tuesday Talent Show, Totally Tasty Tuesday, Whatcha Whipped Up Wednesday, Cast Party Wednesday, Sweet Treats & Swanky Stuff, Thursday Treasures, Kitchen Fun & Crafty Friday, Share Your Creations Thursday, Pin It Thursday, Inspiration Friday, Foodie Friday, Weekend Wrap Up Party, Weekend Potluck, Weekend Bloggy Reading, I'm Lovin It, Tip Me Tuesday.

Maple-Fried Apples & Maple-Mustard Pork Tenderloin

To contact us Click HERE


Since moving to The South, I've learned that we fry everything down here.  The classic -- fried okra, fried green tomatoes, fried turkey.  The new-to-me-but-I-love-it -- fried squash, fried pickles.  And the okay-who-thought-of-that? -- fried Oreos.  Yes, one of the little local cafes I frequent serves fried Oreos as a dessert. {Oh, and it's totally fabulous! ... in case you were wondering.}
And all these fried things are typically deep-fried.  Ya know, in all kinds of smokin' hot oil that the food-of-choice is completely submerged in until it's a crunchy golden brown, oh-so-delicious-but-no-so-great-for-you bite.

So, when I encountered 'fried apples' on a menu one day, ...

which is a very common Southern side dish choice ... I was a tad confused.  Deep-fried apples??  I couldn't quite picture how that would be done ... or what the end result would look like.

Well, it turns out that not all things labeled fried are deep-fried ... like these apples.  They're actually pan-fried.  So why they're not called something else is beyond me.  But whatever you call them ... fried apples, pan-fried apples, sauteed apples ... they're fantastic!


When it came time for me to give these a go at home, I had to put my own Northern spin on them ... drenching them with pure Vermont maple syrup during the frying process, of course!  Mmmmm, so good.

And you want to know what these Maple-Fried Apples pair wonderfully with?  Pork tenderloin.  I think they'd be great with most any pork tenderloin version, but they're especially great with another maple-inspired staple in my kitchen ... Maple-Mustard Pork Tenderloin.


Can you tell I'm in a maple mood?

It's not hard to get me in a maple mood.  I mean, I practically grew up on the stuff.  But this maple mood has been inspired by Tonewood Maple, which I posted about in my last week's Vermont Maple No-Bake Cookies post.  So today, you're getting a two-for-one ... two great maple recipes in one post!  You're welcome.

Hope you enjoy some maple-iciousness soon!   If you're in a maple mood, these are two great go-to's.


I invite you to follow The Kitchen is My Playground with Pinterest, Facebook, Google Friend Connect, Linky Followers, bloglovin', or Feedburner. Buttons are in the right sidebar. I'd love to have you back soon!


Maple-Fried ApplesSource:  A Tracey original
4 to 6 fresh Rome or McIntosh apples1 T. butter1/4 c. pure maple syrup (preferably Vermont Grade B)
Peel, core, and slice apples about 1/4"-1/2" thick.  Melt butter in a saute pan over medium-high heat.  Add apples to the pan and drizzle with the maple syrup.  Reduce heat slightly and cook, stirring occasionally, until apples are soft and tender, about 20 minutes.


Maple-Mustard Pork TenderloinSource:  Adapted from Cooking Light magazine
2 (1 lb. each) pork tenderloins1/2 c. Dijon mustard4 T. pure maple syrup2 T. chopped fresh rosemary1/2 tsp. sea salt1/2 tsp. ground black pepper
Place pork on a broiler pan coated with cooking spray (I line my pan with aluminum foil first ... it makes clean up way easier). 
Combine mustard, maple syrup, rosemary, salt, and pepper in a small bowl.  Brush over the pork tenderloins, repeating to get as thick a coating as possible without creating a big pool of maple-mustard glaze in your pan (you may not use up all the glaze).
Bake at 425 degrees for about 25-40 minutes until a meat thermometer registers 160 degrees (for slightly pink).  Let stand about 10 minutes before slicing. 
This is great served with Maple-Fried Apples on the side or spooned over the top.

Enjoy!

This post is linked with Whatcha Whipped Up Wednesday, Cast Party Wednesday, Sweet Treats & Swanky Stuff, Thursday Treasures, Share Your Creations Thursday, Pin It Thursday, Inspiration Friday, Foodie Friday, Weekend Wrap Up Party, Weekend Potluck, Strut Your Stuff Saturday, Your Great Idea Party, Nifty Thrifty Sunday, Think Pink Sunday, Sundae Scoop, On the Menu Monday, Sunday Showcase Party, This Week's Cravings, Mangia Mondays, Marvelous Mondays, Tuesday Talent Show, Trick or Treat Tuesday, Totally Tasty Tuesdays, Lil' Luna Link Party.

Pumpkin Apple Streusel Muffins ... 2 fall flavors are perfect together!

To contact us Click HERE

It has been an absolutely beautiful fall week in North Carolina!  Well, I guess I shouldn't speak for the entire state ... it is a rather large state ... so, let me rephrase to ... it's been an absolutely beautiful fall week in my part of North Carolina!  And the leaves have really starting coming down in our back yard the past two days.  I swear, like overnight they all just fell.  Yesterday, a back yard of bright green grass ... today, a blanket of orange-and-yellow-and-brown oak leaves.  Fall has fallen!
Which has led me to baking with fall flavors. ...

I love fall flavors.  Fall, to me, is pears ... and persimmon ... and pecans ... and maple ... and apples ... and pumpkins. 
Especially, it's apples and pumpkins!  Soooo, why not put these two flavors together? 
Why not, indeed!  And while we're at it, let's add a nice crunch with streusel topping.  You know, just 'cause we can.


In these Pumpkin Apple Streusel Muffins, the pumpkin base is made just that much better by adding chunks of juicy, fresh fall apples.  When you take a bite you get the wonderful combination of tender pumpkin muffin, crunchy-sweet streusel, and moist-and-juicy apple.  Deeee-lish.


These are one of my all-time favorite muffins. I hope you enjoy them, too!

What are your favorite fall flavors?

I invite you to follow The Kitchen is My Playground with Pinterest, Facebook, Google Friend Connect, Linky Followers, bloglovin', or Feedburner. Buttons are in the right sidebar. I'd love to have you back soon!


Pumpkin Apple Streusel Muffins
Source:  Adapted from a magazine whose name I can't remember, a very loooooongg time ago

Muffins:
2 1/2 c. all-purpose flour
2 c. granulated sugar
1 T. pumpkin pie spice
1 tsp. baking soda
1/2 tsp. salt
2 eggs, lightly beaten
1 c. 100% solid-pack pumpkin (NOT pumpkin pie filling)
1/2 c. canola oil
2 c. peeled, finely chopped apple

Streusel Topping:
2 T. all-purpose flour
1/4 c. granulated sugar
1/2 tsp. ground cinnamon
2 T. butter


Streusel Topping:  In a small bowl, combine the 2 tablespoons flour, 1/4 cup sugar, and ground cinnamon.  Cut in butter until mixture is crumbly.  (You can use two knives, a pastry cutter, or your fingers ... I just use my fingers to crumble everything together.)

Muffins:  In a large bowl, combine the 2 1/2 cups flour, 2 cups sugar, pumpkin pie spice, baking soda, and salt.  In a medium bowl, combine the eggs, pumpkin, and oil.  Add the liquid ingredients to the dry ingredients; stir just until moistened.  Stir in apples.

Spoon batter into lightly greased and paper-lined muffin cups, filling 3/4 full (there should be about 18 muffins).  Sprinkle streusel topping evenly over the filled muffin cups.

Bake at 350 degrees for 35-40 minutes, or until a toothpick inserted in the center comes out clean.

Enjoy!


This post is linked with Nifty Thrifty Sunday, Think Pink Sunday, Sundae Scoop, On the Menu Monday, Sunday Showcase Party, This Week's Cravings, Mangia Mondays, Marvelous Mondays, Crazy Sweet Tuesday, Tuesday Talent Show, Trick or Treat Tuesday, Totally Tasty Tuesdays, Lil' Luna Link Party, Tip Me Tuesday, Cast Party Wednesday, Thursday's Treasures, Pin It Thursday, Inspiration Friday, Foodie Friday with Diane Balch, Foodie Friday, I'm Lovin' It, Weekend Potluck, Sweet Treats & Swanky Stuff Saturday, Sweets for a Saturday, Weekend Wrap Up Party, Strut Your Stuff Saturday.

Individual Veggie Quiche Cups To-Go

To contact us Click HERE

I don't know about you, but I get so bored with my breakfast routine.  I mean, I seem to get stuck in a rut of the same-ol'-same-ol' over, and over, and over, and over ... which is further complicated by the fact that I try to eat low-carb for breakfast.  Carbs and I just aren't good friends in the morning. Well, guess what? ...

These little babies are just the perfect low-carb breakfast treat to mix up the ol' routine!  And what's better - they can be made ahead and popped in the freezer ... to be taken out and reheated as you're ready for them.  Oh, I'm all about that. With a great mix of flavorful veggies and their ease-of-travel, they also frequently find their way into my lunch box.  I usually whip up a double batch when I make them and have them in the freezer to grab-and-go for those mornings when I'm ...well ... running behind.  Not that that ever happens or anything.  {Insert sarcasm here.  I'm about as faarrrrrrr away from a morning person as you can possibly get.} And these come together really easily, too. Just chop up some fresh mushrooms, red bell pepper, and onions and mix these veggies with some spinach, eggs (or egg substitute), and shredded cheese. 
Then scoop the egg mixture ...


... into foil-lined muffin cups ...


... and bake them up.  Easy!  And now you've got individual veggie quiche cups to-go ... ready and waiting.


Now, a brief word about the foil muffin cup liners ... highly recommend them.  But, ya know I had to check out what happens when you don't use them.  Just see below.  Not a good plan.


 But in their little foil liners, quiche cups are all ready to go.  {Hey - take me with you, take me with you!}  I invite you to follow The Kitchen is My Playground with Pinterest, Facebook, Google Friend Connect, Linky Followers, bloglovin', or Feedburner. Buttons are in the right sidebar. I'd love to have you back soon!


Veggie Quiche Cups To-Go
Source:  Adapted from The South Beach Diet cookbook

1 (10 oz.) package frozen chopped spinach, thawed and well-drained
7 eggs or 1 3/4 c. egg substitute
3/4 c. shredded cheddar cheese
1/4 c. finely diced red bell pepper
1/4 c. finely diced mushrooms
1/4 c. finely diced onion

Line 12 muffin cups with foil baking cups; spray with non-stick cooking spray.

Combine all ingredients in a bowl and mix well.  Divide the mixture evenly between the muffin cups.  Bake at 350 degrees for 20-25 minutes, until set and a knife inserted in the center comes out clean.

Store refrigerated.  Remove from foil liners and reheat in the microwave when you're ready to eat them. 

These also freeze very well.  Freeze after fully baking.  When you're ready to eat them, thaw, remove from the foil liners, and reheat in the microwave.

Enjoy!


This post is linked with Thursday's Treasures, Pin It Thursday, Inspiration Friday, Foodie Friday with Diane Balch, Foodie Friday, I'm Lovin' It, Weekend Potluck, Weekend Bloggy Reading, Sweet Treats & Swanky Stuff Saturday, Weekend Wrap Up Party, Strut Your Stuff Saturday, Sundae Scoop, Think Pink Sunday, Nifty Thrifty Sunday.

13 Ekim 2012 Cumartesi

Pineapple-Pecan Chicken Salad

To contact us Click HERE

I'm baaaaaack!  I've been unplugged for almost a week now, spending some time at the beach with my Mom.  I had a week of two of my favorite things ... the beach, and hanging out with Mom.  We stayed up way too late, drank way too much wine, and had way too much fun.  Well ... strike that last one ... it's not possible to have too much fun, is it?

And the day after I got back from the beach, I headed out on a day trip with some friends to do one of my other favorite things - wine tasting!  Yes, I love me some wine.  (North Carolina has quite the up-and-coming wine region, by the way, with over 100 wineries across the state.  Check 'em out at visitncwine.com.)

So I guess I've been very spoiled this past week.

Hmmm, so now I'll spoil myself with one of my favorite chicken salads, this Pineapple-Pecan Chicken Salad.

Chicken salad is one of my favorite lunch foods.  Since I eat it so often, I mix it up with lots of different variations ... you've gotta change it up, right?  This version has such a nice, refreshing flavor with all the pineapple in it.  Just perfect for summer.  Whether it be summer time at the beach, or wine tasting, or any of our other favorite summer things.
I invite you to follow The Kitchen is My Playground with Pinterest, Facebook, Google Friend Connect, Linky Followers, bloglovin', or Feedburner. Buttons are in the right sidebar. I'd love to have you back soon!


Pineapple-Pecan Chicken Salad
Source:  Adapted from Seaboard To Sideboard  by The Junior League of Wilmington, NC

3 c. chopped cooked chicken breasts
1 c. finely chopped celery
2 green onions, sliced (about 3 T.)
2 T. finely chopped green pepper
1 tsp. salt
Dash of black pepper
1/2 c. mayonnaise
1/2 c. chopped pecans
1 (20 oz.) can pineapple tidbits, drained
2 T. lemon juice

Combine chicken, celery, green onion, green pepper, salt, black pepper, and mayonnaise in a bowl; mix well.  Stir in pecans, pineapple, and lemon juice.  Chill for about 30 minutes before serving.

Enjoy!


This post is linked with Sunday Showcase Party, On the Menu Monday, Mangia Mondays, Tuesday Talent Show, Totally Tasty Tuesdays, Cast Party Wednesday, Whatcha Whipped Up, Full Plate Thursday, Sweet Treats & Swanky Stuff Thursday, Foodie Friday, Foodie Friday with Diane Balch, Inspiration Friday, Weekend Potluck, Weekend Wrap-Up Party, Strut Your Stuff Saturday, Scrumptious Sunday, Nifty Thrifty Sunday, Think Pink Sunday, Sundae Scoop.

7 Layer Cookies

To contact us Click HERE

Merry Christmas in July!  My bloggy friend Yvonne at Stone Gable has a Christmas in July party going on right now, and today she posted the most beautiful white poinsettia stockings.  Impressive.  Truly impressive.
While I choose to live in denial that some local stores already have their Christmas decorations out ... I kid you not ... three weeks ago I saw one store putting them out! ... Yvonne's Christmas in July party inspired me to share one of our family's favorite Christmas-time cookies in honor of the occasion.
Now, I say Christmas-time cookies, not simply Christmas cookies, because the beauty of these sweet layer cookies is ... well ... they're not Christmas cookies!  Which means we can all enjoy their layered deliciousness any  time of the year!!It just so happens that 7 Layer Cookies are a staple of my Mother-in-Law's Christmas day cookie tray.


I did not have the pleasure of meeting Mark's Dad.  But the story goes that these were one of his favorite cookies.  It's been told that, several years, Mark's Mom had to make more of these right before Christmas day because Mark's dad had eaten them all!  Ummm-hmmmm ... they're that good.

And they're only 7 ingredients.

Layered in a pan.

That's how they got the name 7 Layer Cookies.

You probably hadn't figured that out, had you??

Now, all snug in the baking pan, these cookies look all innocent, don't they?  But ...


... once you cut into them, their layered awesomeness is revealed!  And layered awesomeness it is.  Truly.  Mark's Dad wouldn't steer us wrong! 


I invite you to follow The Kitchen is My Playground with Pinterest, Facebook, Google Friend Connect, Linky Followers, bloglovin', or Feedburner. Buttons are in the right sidebar. I'd love to have you back soon!


7 Layer Cookies
Source:  My Mother-in-Law

1/2 c. butter
1 1/2 c. graham cracker crumbs
1 c. flaked coconut
1 c. (6 oz.) chocolate chips
1 c. (6 oz.) butterscotch chips
1 (14 oz.) can sweetened condensed milk (fat free works just fine)
1 c. chopped pecans

Melt butter in a 9x13" baking dish.  Add remaining ingredients in layers, in the order listed, sprinkling each ingredient evenly over the previous layer.

Bake at 325 degrees for about 30 minutes.  Let cool completely in the baking dish.  Cut into small squares.

Enjoy!


This post is linked with Cast Party Wednesday, Whatcha Whipped Up, Full Plate Thursday, Sweet Treats & Swanky Stuff Thursday, Foodie Friday, Foodie Friday with Diane Balch, Inspiration Friday, Weekend Potluck, Weekend Bloggy Reading, Weekend Wrap-Up Party, Strut Your Stuff Saturday, Sweets for a Saturday, Scrumptious Sunday, Nifty Thrifty Sunday, Think Pink Sunday, Sundae Scoop, Sunday Showcase Party, On the Menu Monday, Mangia Mondays, Crazy Sweet Tuesday, Totally Tasty Tuesdays, Tuesday Talent Show, Share Your Creations, Pin It Thursday.